Tuesday, July 13, 2010

Game Castle Summer League '10


After a couple of test games with my version 1 army, I came to some conclusions:

-The basilisk, which was originally a filler unit, is really good and I'm keeping it. Dropping cover-ignoring AP3 shots on top of guys anywhere on the board, whether you can see them or not, is really tactically invaluable.

I had to make some modifications to my old basilisk model. The paint job is from my Iron Warriors army of 2001 (back when Iron Warriors could take a basilisk in 3rd edition). So I pulled off the chaos trophy racks and the servitor crewman and am in the process of sticking on imperial gubbins before the new paint job.

-The 30-man blob plus everybody else is a vehicle works really well. Hybrid mech. The blob protects the vehicles from things they're vulnerable to, and the vehicles do the killing that the blob can't.

-Although I was originally against heavy weapons in the blob--because I figured they'd be moving a lot--if you crunch the numbers you find that putting 3 heavy weapons in 3 infantry squads is cheaper than an additional heavy weapon squad for the same number of guns. Because you don't have to make the outlay for the HWS, you can pack more heavy guns into the army by filling up your infantry squads first, then buying more weapons for heavy weapon squads with additional points. Also, if the 3 infantry squads are blobbed and have heavy weapons, you can give them "bring it down" and "fire on my target" orders on the commissar's leadership of 9.

So with these insights in mind, here's the list I plan to play in the Game Castle Summer league starting tonight:

  • CCS, 3 meltaguns, in a chimera with hull heavy flamer
  • Infantry Platoon
    -PCS, 3 flamers in a chimera, hull heavy flamer
    -3 infantry squads with autocannons, one with a commissar, sergeants with power weapons and meltabombs
    -Autocannon heavy weapon squad
    -Missile launcher heavy weapon squad
  • Vet squad, 3 meltas, in a chimera
    (not happy with this choice, but I need a second troop)
  • Devil Dog, dozer blade, hull heavy flamer
  • Devil Dog, hull heavy flamer
  • 2 Hydras, hull HF
  • Basilisk, hull HF
  • Leman Russ BT, hull HF
The points are very tight on this list--not even enough slack to get a dozer blade for the second devil dog. But I think that's the most heavy guns (and AP3 templates) I can manage to pack into 1500 points without breaking something.
6 infantry autocannons
4 hydra autocannons
3 missile launchers
6 infantry meltas
2 melta cannons
3 infantry flamers
3 multilasers
Battle Cannon
Earthshaker Cannon
9 hull-mounted heavy flamers

Thursday, July 1, 2010

Give Em a Hand!

After many months of working on learning to resin-cast very small parts, I was finally able to make a hand with an autogun (counts as lasgun) for each and every handless Dust Devil in my first 1500 point list.

Image above shows three sample DDs, each holding a lasgun/autogun in one hand and a knife in the other. With some variation, this is the pattern for the whole army:

All the infantry for the 1500 point version, including Necro heavies with meltas and flamers. Still working on the gun crews, and I eventually want unique sergeant and officer conversions. But this is good enough to get playing.

Thursday, June 3, 2010

Reboot

So after taking a couple years out to play a mech marine army, and now that the current IG codex is actually competitive and fun, I have the summer to work on getting the Dust Devils together again.

Phase 1 is making a viable 1500 point army for the Game Castle summer league. I know I want devil dogs, and I know I want to use existing models that I have (a manticore, a couple of hydras, only 3 chimeras available), and I know I don't want to buy any valks. Using Stelek's principles of army building (and one of his lists as a basic template) here's version 1:

  • CCS, 3 meltaguns, in a chimera with hull heavy flamer
    (CCS gets meltaguns because of the BS4. Only three instead of four because of points--in the 1750+ version this is easily boosted to four.)
  • Infantry Platoon
    -PCS, 3 flamers in a chimera, hull heavy flamer
    -3 infantry squads, one with a commissar, sergeants with power weapons
    (The blob, or in non-KP missions they can grab/hold objectives, bubble-wrap, or die gloriously for the clan and to save the emperor's tanks)
    -2 Autocannon heavy weapon squads
  • Vet squad, 3 meltas, in a chimera
    (not happy with this choice, but I need a second troop)
  • Marbo
  • 5 stormtroopers w/ 2 plasma
    (I'd prefer melta, but plasma is the models I have. These guys will be swapped out most likely in later weeks for the second devil dog, once I get the model. But I will still feel the need for some infiltrators.)
  • Devil Dog, dozer blade, hull heavy flamer
  • Manticore, hull HF
  • 2 Hydras, hull HF
  • Basilisk, hull HF
1500 on the nose. So that's 6 regular autocannons, 4 hydra autocannons, 6 meltaguns and a melta-cannon, 3 flamers, a bunch of hull heavy flamers, earthshaker, stormeagle, and a couple of meltaguns. It seems like it should play as a phased army--shooting a lot in the early game, then maneuvering in the mid game, and holding or mopping up in the endgame. Should be fun.

Pictures coming soon.

Friday, August 1, 2008

Hellhond 3: Zimmerit


Okay, so once I got the chassis of my hellhound modeled (above) it was pretty beat up. Filing and carving and changing my mind about things left the glacis and top deck with all kinds of ugly scars. I wanted a way to cover up this mess without losing the authenticity of the model, and then I remembered that I'd always wanted to try modeling a tank with zimmerit.

Zimmerit is an nonmagnetic paint that the Germans used to apply to the hulls of their tanks. It seems that early in the war, the Germans had developed magnetic antitank mines that could be applied to the hull of a tank by an infantryman, and they were worried that other countries would also develop these mines and take out their tanks. So they painted the hulls of tanks at the factory with a substance made of nonmagnetic metals, sawdust and other stuff, then trowled up the surface in various different patterns to prevent magnetic mines from sticking. The magnetic mine scare turned out to be overblown, and in late 1944 the Germans stopped putting zimmerit on their tanks. But you can still see it in many historical photographs and also on surviving armored vehicles.

Even people who don't know about zimmerit and won't recognize it on a model, though, still have a vague feeling of having seen it and will perceive it as a "tanky" sort of thing even if they don't know why. It looks right, and for my purposes is perfect since the textured surface would cover my conversion mistakes.

Thanks to the Aeroscale message boards for this method of doing zimmerit with green stuff. There are many ways to model zimmerit, but this is the easiest one I've found and produces a good result.

First, roll out a pancake of greenstuff. I used a beer bottle, a hard surface, and plenty of water to keep it from sticking.
Next, drape your pancake over the part of the model to be coated with zimmerit.

Tuck in and cut off the corners with a modeling knife. Press down the surface so that ridges and rivets show through from below. Cut around the edges of hatches, treads, intakes, and other places where zimmerit wouldn't be applied.
At this point, about half an hour or less, the basic coat is done.

This method is eight-thousand times easier than most zimmerit modeling methods that require you to spread fiddly putties onto the surface of the model with a spreading stick. Your green stuff pancake is much easier to get to a uniform thickness than spread putty, and it has a working time of hours as opposed to the mere minutes or seconds that some putties allow.

Next, texture up the surface of the putty with a damp sponge. This simulates the actual texturing of the paint historically.

Now press the zimmerit pattern that you want into the surface of the putty with a damp tool of some kind.

I went with a common horizontal line pattern because it was easy to do with my hobby knife. But some people cut plasticard or use sculpting tools. The advantage of this being a SF game is that I don't have to worry about historical accuracy, just communicating the feel of zimmerit.
The trick I learned at this point is that you're *stamping* and *pressing* the pattern into the surface rather than *raking* it into the putty. If you try to draw a tool across the surface, drag will cause the green stuff to wrinkle and bunch up. As usual, the tool has to be wet.
The finished zimmerit pattern from two angles, above and below.
I cut a chunk out of a corner below to represent a spot where the factory-applied paint had worn off. Also you'll notice I left some parts of the glacis uncovered, again to represent worn places. This type of wear is commonly seen in photographs of WWII zimmerit.
Finally, any gubbins that are going on top of the zimmerit need to go on while the putty is still pliable.
With the turret on, the faint remains of the original turret ring under the putty are invisible.

Next, gubbins.

Hellhound 2: Turret

The standard hellhound turret looks like a chimera turret with some extra armor on it and an inferno cannon instead of a multilaser. I didn't want to depart too much from the standard model here, but I wanted something that looked home made, like it was built or enhanced by nomads. So I started with the standard chimera turret, but reversed it, covering the multilaser port with the slightly-trimmed basilisk driver's hatch door.

I have a bunch of these dual heavy flamer nozzles lying around from old-school vehicle sprues, so I doubled up a couple of them and stuck them to the back of the turret to make it into the front. Then to make sure it didn't look like the turret was backwards, I used spare pieces of the chimera kit and some other old rhino parts to set up a blast shield:

I think the trick with this kind of work is to (1) leave as many rivet heads showing as possible so it looks more like metal and less like plastic and (2) not to go overboard, unless you're converting ork vehicles. For nomad vehicles I can already see that the biggest challenge is going to be to strike a balance between making things look like the nomads modified them, versus crossing over into ork-like bricoleurism.


Okay, so once the basic turret is bashed together, it needs a gunner. I gotta make this Cadian gunner torso topped by an Empire Fantasy militia head into a proper ash nomad head.Step one, he needs a shoulder cape and hood to cover up all that fancy Cadian uniform piping. The shoulder cape starts with a flat ribbon of green stuff:
The ribbon wraps around the crewman's neck and shoulders, and gets smoothed as much as possible.
Notice also that I've filed off the line at the edge of the Empire militiaman's do-rag to make it look like he's bald. The bandanna-headed guy is the easiest to convert to bald.
Next I made a little cone of green stuff (picture above) and stuck it to the back of the shoulder cape.
That cone gets smoothed in and shaped into the flattened hood shape below, using a sculpting tool and plenty of water.I freely admit I'm not the best greenstuff smoother, but I figure hitting it close is good enough. It's supposed to be rough cloth anyhow, and it'll be in camouflage color later on anyway.

Now for goggles, cut a couple of little bits of greenstuff from a greenstuff snake.
Stick em on the model's eyes and flatten them out until they are shaped like dished disks.
Flatten a section of that tiny green stuff snake above and flatten it around the head for a goggle strap.
And there it is below. The hellhound turret, with homemade Ash Nomad gunner. A trimmed hatch from an old-school rhino and hatch ring from the old vehicle accessory sprue complete this part.
Next time: a surprise twist for the hellhound's hull.

Hellhound 1: Chassis

So why am I making double-wide chimera treads?

Well, definitely not for a chimera. Double-wide treads look fine on a Leman Russ, but on a chimera they're just too much and they look goofy. But the DorkaMorka guys are having a conversion contest and I want to make that hellhound I always wanted and enter it.

So, to give credit where it's due, the basic concept for this hellhound is shamelessly stolen from Warmonger Matt Birdoff's hellhound conversion in his award-winning Tallarn army. It's an open-bed chimera with GW oildrums that suggest they're full of prometheum flamer fuel. Here's the picture from the Warmonger Club site:

I asked Birdoff for advice on how he did it and he gave me some pointers. I don't want to make an exact copy, and in fact the finished product won't be that similar, but Birdoff definitely deserves credit.

So to start, rather than leaving the front of the chimera slung low, basilisk style, I decided I wanted a full chimera-style glacis for mounting the turret. Easiest way to produce an open-bed chimera chassis with a full glacis is to cut the roof in half, exposing the kit's open bed.

The yellow tool pictured there is one of my favorites from micromark. It's designed to score plastic by drawing that hook along a straightedge or whatever. You just keep scoring until you get through the plastic or until it's weak enough to snap. It's great for thicker plastics, more sure than a hobby knife and can cut where a razor saw won't go.

Okay, so attaching the top plate of the chimera kit creates the basic chassis of the hellhound-to-be. Note the double-wide treads.
I filed off the original turret mount and made a hole too far forward, then changed my mind and made another one further back before finding the spot where I really wanted the turret to be.

You might notice in later steps that I don't attach the boxy skirt plates to the outsides of the tread pieces. Experimentation showed that with the double-wides, the skirt plates made the whole model cartoonishly wide. I have better plans for those big open expanses of bare plastic later on.

Okay, so attaching the front half of the top plate leaves a big hole behind, so a little filing and cutting adapts the chimera back hatch to fit underneath.
All through this project I was pretty impressed with the flexibility of the chimera kit for conversions. Various parts fit in all kinds of unexpected places with just a little modification.

Next to hide the ugly open bed, I used one of those ubiquitous GW scenery platforms with the textured surface that I have lying around and never actually managed to incorporate into scenery. It raises the bed high enough so that the oil drums can be added later, and makes the inside of the chimera bed look like the actual inside of a vehicle, rather than the inside of a plastic model.

The bed piece fit with just a bit of filing on one edge--the edge that will later be hidden under the oil drums. But it cuts off the lower half of the access hatch, though, and I wanted to make it look like the crew could still get in and out that way. So I cut a bit off the access hatch from the kit and it just popped into place. So there's the basic chassis. Next, the hellhound turret.

Tuesday, July 29, 2008

Doublewide Chimera Treads

In the old days when you could call GW mail order and order any sprue you wanted, the standard way to give tank double wide treads was to order an extra wheel sprue and an extra tread sprue for each tank and just double them up (maybe with a plastic spacer). But in these days of limited bitz availability, I needed a way to get the same effect with fewer parts. Luckily I have a lot of extra LR tread sprues (because of a mailorder mixup back in the late 90's) but could never get the trolls to send me more wheels. So I developed this method for extending the wheel sprue (the gray one below) so that one complete wheel sprue will do one complete double--wide tank. You still need two tread sprues though.
The LMBT and Chimera chassis road wheels are really only there to give you something to glue the treads to. Unlike most model tanks, the wheels don't really show beneath the treads and the tread links don't come off. So half a wheel should be enough to support a tread . So I use a razor saw to cut each road wheel in half, then glue one half to the inside of the tread module, and the other half to the outside.
Twelve road wheels plus the two bigger drive wheels is kind of tedious. That's what books on tape are for. They don't have to be pretty because they won't show. Centering the large drive wheels on the side with no pin is a little tricky--use the edge of the drive plate to get it aligned in such a way that it'll hold a tread. Because that's all it really needs to do.


Next glue the treads to the half-wheels just as you would if the whole wheel were there. I use plastic solvent glue (the black bottle below) because it gives a much more durable bond to plastic parts than superglue. Throw away the included plastic applicator and use the bare wire to lay down your bead of glue. As always when appplying old black-sprue LR treads to a chimera model, start at the top and work down both sides because the treads don't fit and you want the gap out of sight at the bottom. The new gray chimera tread sprue doesn't have this problem.
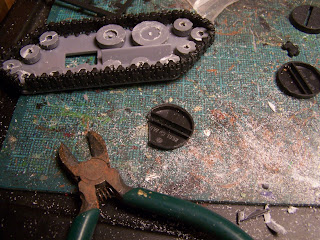
When the treads are glued on, it would be possible to do something like take a big hunk of milliput and use it to glue the two halves of the tread module together. But I was out of milliput so I needed another way to space the tread sides out while holding them together. By experimenting around I discovered that three slotta bases stacked up make a spacer just the right thickness. Everybody has lots of extra slotta bases and they're cheap and available, so that's what I use.

First cut a notch in one base to accommodate the dingus that sticks in from the outside of the outer tread plate:
The placement of this one spacer, on top of the wheels, shown below:The rest of the spacers just stack up on top of the wheels with no problem. Use plenty of solvent glue both to hold the slotta bases together and to bond them to the wheels where they touch.


Then just glue the other plate of the tread module down and clamp or rubber-band it overnight:There's the finished tread module. Now go make another one.